Beamball - Steam integration
This page explains how to integrate a Beamable game with Steam using the Beamable Unreal SDK and Beamable Microservices.
Introduction
Aside from the BeamableCore Plugin, here is what the sample contains:
BEAMPROJ_BeamballUnreal Plugin.: Contains the UE implementation for the clientMicroservices/services/BeamballMsMicroservice: Microservice containing code that implementsIFederatedLogin
To set up this sample, you will need a few things:
- A Beamable Account and a Realm
- A Steam Developer Account
To configure the sample, run dotnet beam unreal select-sample BEAMPROJ_Beamball.
Assumptions
Instructions below assume that you already have the Steam application created in Steam's Developer portal. If that is not the case, be sure to create one first.
Configuring the sample as a Steam application
This sample integrates with a third-party platform, so it relies on your own credentials and Beamable does not host a ready-to-run version. Set up a Steam account and configure the sample:
- Log into your Steam developer account
- Go to your App and set aside its
AppId - Create a Publisher Web API key using this tutorial. Set it aside in a notepad for future use.
- Make sure that the game is added to the user that you want to use to log in. To do that:
- Generate a Steam Key
- Add it to your Steam account so you can access the game
Setting up Beamable systems
Next, configure a Beamable realm to work with your Steam App:
- Go to the Beamable Portal and create a new Beamable realm called
beamball-demo - Go to the Portal (
Account) and set aside your Customer Id (CID) - Go to the Portal and set aside your realm's PID and Realm Secret (
Games -> YourGame -> beamball-demo) - On the Portal open the Realm Config page of the
beamball-demorealm (Operate -> Config) - Hit the
Add Configbutton - Set the following key-value pairs for the namespace
"steam_integration":"appid"-> Your Steam application ID"key"-> Your Steam Application Publisher Key
- Compile and open the
BeamableUnrealeditor (it will be configured as theBEAMPROJ_Beamball) project - Sign into your Beamable account and go to the
beamball-demorealm- Hit
Apply to Build
- Hit
- Open a bash terminal at the
BeamableUnrealroot directory - Run
dotnet beam project enable --with-group BEAMPROJ_Beamball - Run
dotnet beam project disable --without-group BEAMPROJ_Beamball - Guarantee
Dockeris open and running - Run
dotnet beam deploy plan- This tells you details about the services you would deploy given your project's local state
- Run
dotnet beam deploy release --latest-plan- This deploys the services outlined by the generated plan in the previous command
- Go to the Portal (
Operate -> Microservices) to verify that the microservices have initialized - In
DefaultEngine.iniset the value ofSteamDevAppIdto your Steam Application ID. For more info, see the Unreal Engine Steam tutorial - Package the project using the
BeamableUnrealSteamtarget
Now, you are ready to log in with Steam.
Playing the sample
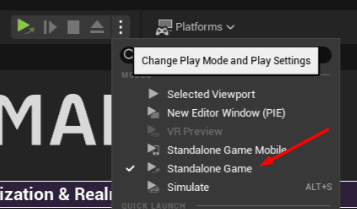
Test the Steam integration in PIE's Standalone Game mode, as per Steam's documentation.
To test the sample:
- Open Beamball with Steam running on the account to which you added the game
- You should see your "Steam" status change to playing
- On the login screen, you should see a Steam button. Press it
Sample highlights
This sample demonstrates a complete Steam authentication integration using Beamable's federated login system.
Client-side implementation
The client uses the Steam SDK directly to obtain authentication credentials. The implementation in BeamableSteam.h provides a TryGetSteamData function that:
- Retrieves Steam User Interface: Accesses the Steam SDK's
ISteamUserinterface to interact with the authenticated Steam user - Generates Auth Session Ticket: Calls
GetAuthSessionTicket()to generate a cryptographic proof that the user owns the game and has an active Steam session. This ticket is a binary blob that Steam can validate server-side - Converts Ticket to Hex String: The binary ticket is converted to a hexadecimal string format for transmission to Beamable
- Obtains Steam ID: Retrieves the user's unique Steam ID (SteamID64) for identification
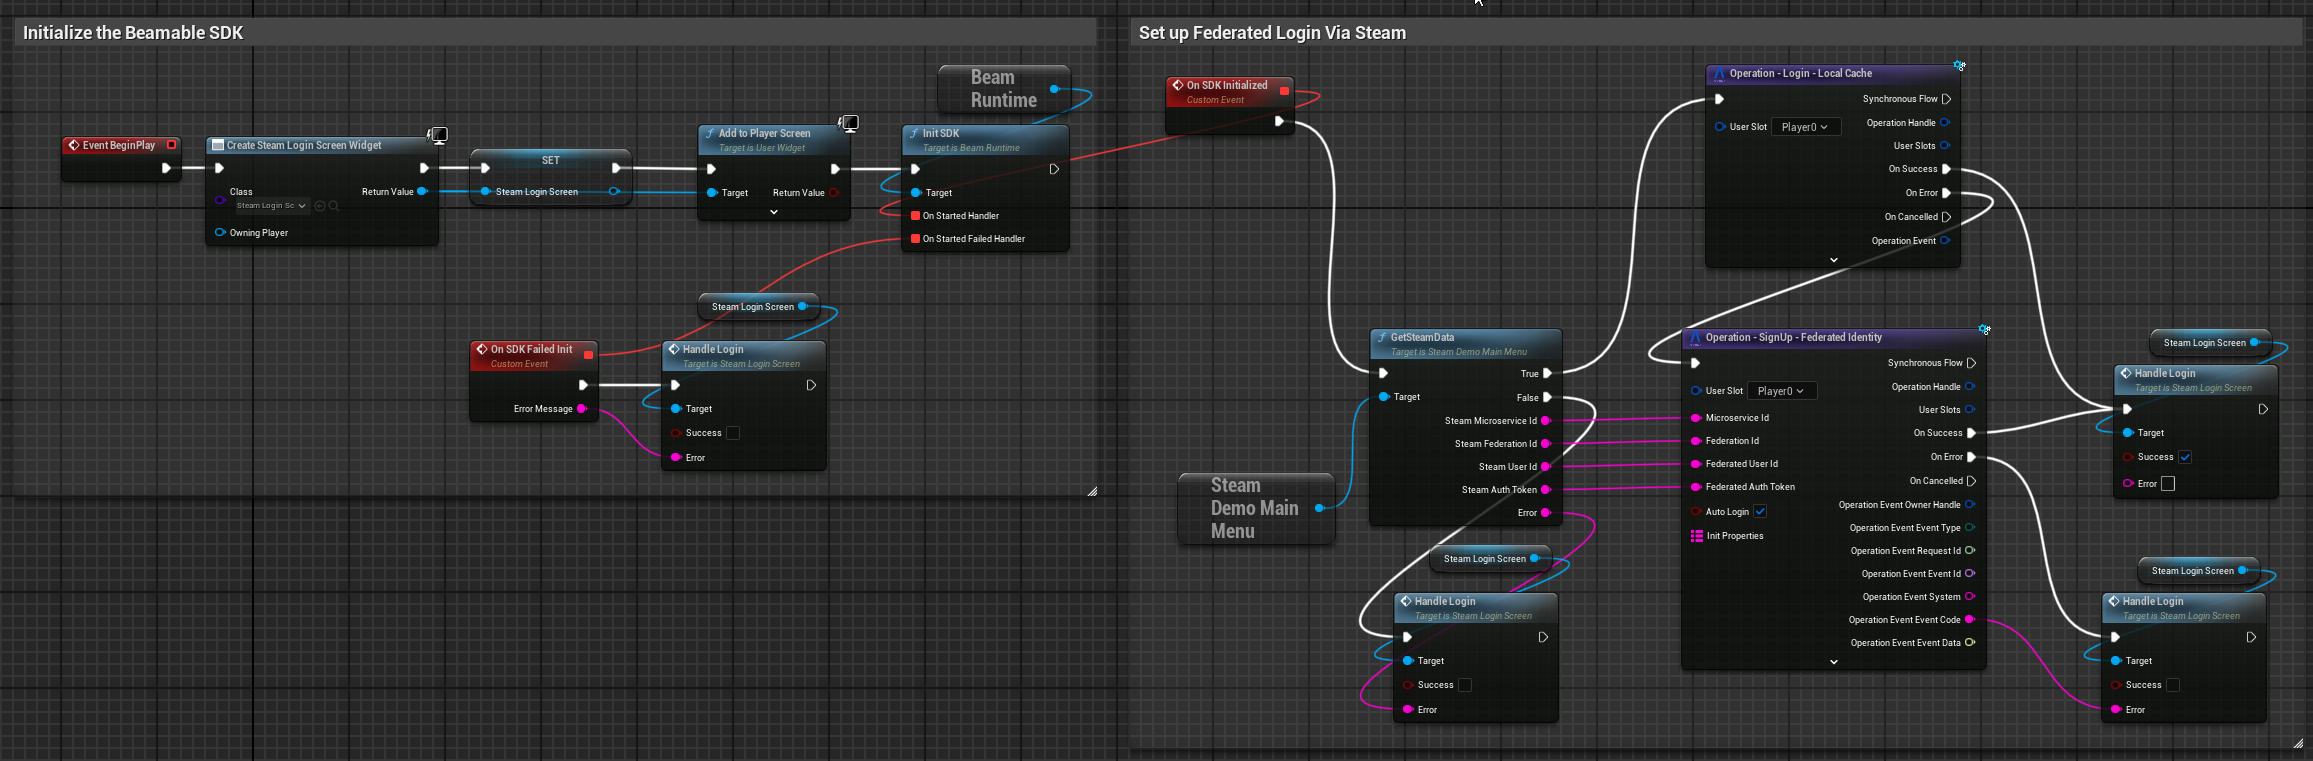
In Blueprint, you can invoke the Steam login flow using operation nodes:
Server-side implementation (Microservice)
The BeamballMs.Steam.cs microservice implements IFederatedLogin<SteamId> to handle authentication:
- Authentication Flow: When a user attempts to log in, the microservice receives the Auth Session Ticket from the client
- Ticket Validation: The microservice calls Steam's
AuthenticateUserTicketWeb API endpoint to validate the ticket against Steam's servers using your Publisher Web API Key - User Identification: Steam returns the user's unique Steam ID (SteamID64), which becomes the federated identity linked to the Beamable account
- Player Initialization: For first-time users, the microservice calls Steam's
GetPlayerSummariesAPI to retrieve the user's profile data (display name, avatar URLs) and populates the Beamable account with this information as player stats
This two-phase approach ensures that users are properly authenticated via Steam and their account is enriched with Steam profile data for display in-game.
Can I use it as a template?
This sample is NOT a template you can start your own repository from. However, Beamable code components are free for you to copy and use in your own project. Here is what these are:
- The
BeamballMs.Steam.csfile in theBeamballMsMicroservice. You can copy/paste it into any of your microservices - Beamable code inside
BEAMPROJ_Beamball/**/PlatformIntegrationsexcept code inside aThirdPartydirectory - Content inside the
BEAMPROJ_Beamballexcept things inside aThirdPartydirectory
Why no client build
Clients must be pointed at your steam-demo realm, so you need to generate the build yourself by packaging it for any supported platform.
Required files for Steam on Mac
SSL certificate (cacert.pem)
Beamable uses secure socket connections, and on some platforms the OS requires a trusted CA certificate bundle to validate them. Without this file, Beamable network calls may fail silently at runtime.
-
Locate the certificate file bundled with the engine:
-
Copy it into a folder named
Certificatesinside your project's Source folder: -
In your project settings, add this folder to the Additional Non-Asset Directories to Copy list (under Packaging) so Unreal includes it in the packaged build:
Unreal will then bundle the certificate with the build, allowing Beamable to establish trusted connections at runtime.
macOS development: disabling app sandbox
When developing on macOS, the App Sandbox may block Steam network calls and Beamable connections. If you are working in a development build, you should disable the sandbox by editing the entitlements file.
Open the following file in your project:
Set the com.apple.security.app-sandbox key to false:
<?xml version="1.0" encoding="UTF-8"?>
<!DOCTYPE plist PUBLIC "-//Apple//DTD PLIST 1.0//EN" "http://www.apple.com/DTDs/PropertyList-1.0.dtd">
<plist version="1.0">
<dict>
    <key>com.apple.security.app-sandbox</key>
    <false/>
</dict>
</plist>
Warning: Only set
APP_SANDBOXtoNoin development builds. Re-enable it before submitting to production or the Mac App Store.