Beamball - Epic Online Services integration
This page explains how to integrate a Beamable game with Epic Online Services (EOS) using the Beamable Unreal SDK and Beamable Microservices.
Introduction
Aside from the BeamableCore Plugin, here is what the sample contains:
BEAMPROJ_BeamballUnreal Plugin.: Contains the UE implementation for the clientMicroservices/services/BeamballMsMicroservice: Microservice containing code that implementsIFederatedLogin
To set up this sample, you will need a few things:
- A Beamable Account and a Realm
- An Epic Games Developer Account
To configure the sample, run dotnet beam unreal select-sample BEAMPROJ_Beamball.
Assumptions
Instructions below assume that you already have the Epic application created in Epic's Developer portal. If that is not the case, be sure to create one first.
Configuring the sample as an Epic application
This sample integrates with a third-party platform, so it relies on your own credentials and Beamable does not host a ready-to-run version. Set up an Epic Games account and configure the sample:
- Log into your Epic Games Developer Portal
- Create or select your application
- Navigate to Product Settings and note the following values:
- Application ID (also called Product ID)
- Deployment ID
- Navigate to Epic Account Services > Applications
- Create a new Application or select an existing one, and set aside:
- Client ID
- Client Secret
- Configure the Client Policy to allow the authentication methods you need:
- Enable Persistent Auth for automatic re-login
- Enable Exchange Code if launching from Epic Games Launcher
- Enable Account Portal for browser-based authentication
- For PIE testing, download and run the EOS Developer Authentication Tool
- Configure it with your Application ID and use credentials like
Context_1,Context_2, etc.
Setting up Beamable systems
Next, configure a Beamable realm to work with your Epic Application:
- Go to the Beamable Portal and create a new Beamable realm called
beamball-demo - Go to the Portal (
Account) and set aside your Customer Id (CID) - Go to the Portal and set aside your realm's PID and Realm Secret (
Games -> YourGame -> beamball-demo) - On the Portal open the Realm Config page of the
beamball-demorealm (Operate -> Config) - Hit the
Add Configbutton - Set the following key-value pairs for the namespace
"eos_integration":"applicationId"-> Your Epic Application ID"deploymentId"-> Your Epic Deployment ID"clientId"-> Your Epic Client ID"clientSecret"-> Your Epic Client Secret
- Compile and open the
BeamableUnrealeditor (it will be configured as theBEAMPROJ_Beamball) project - Sign into your Beamable account and go to the
beamball-demorealm- Hit
Apply to Build
- Hit
- Open a bash terminal at the
BeamableUnrealroot directory - Run
dotnet beam project enable --with-group BEAMPROJ_Beamball - Run
dotnet beam project disable --without-group BEAMPROJ_Beamball - Guarantee
Dockeris open and running - Run
dotnet beam deploy plan- This tells you details about the services you would deploy given your project's local state
- Run
dotnet beam deploy release --latest-plan- This deploys the services outlined by the generated plan in the previous command
- Go to the Portal (
Operate -> Microservices) to verify that the microservices have initialized - Configure your Unreal project's Online Services for EOS by following the Unreal Online Services documentation
- Package the project using the appropriate build target
Now, you are ready to log in with Epic Online Services.
Playing the sample
Testing the EOS integration in PIE requires the EOS Developer Authentication Tool to be running with configured credentials.
For PIE testing, you have two options:
- Recommended: Download and run the EOS Developer Authentication Tool
- Configure credentials for your PIE instances (e.g., Context_1, Context_2)
- Launch in PIE mode
- Alternative: Use Account Portal (browser-based login) which also works in the editor
- The authentication flow will automatically fall back to Account Portal if Developer Auth Tool is not running
For packaged builds: - The authentication flow will use PersistentAuth (cached credentials), Exchange Code (from Epic Launcher), or Account Portal (browser-based login)
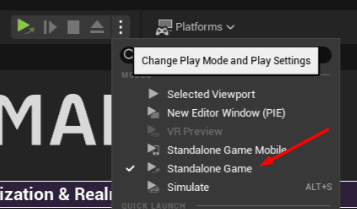
Testing the EOS integration in PIE should be performed in PIE's Standalone Game mode as per Epic's documentation.
To test the sample:
- Launch the game with your Epic account
- On the login screen, you should see an Epic button. Press it
Sample highlights
This sample demonstrates a complete Epic Online Services (EOS) authentication integration using Beamable's federated login system with OpenID Connect JWT validation.
Client-side implementation
The client uses Unreal's Online Services (not the deprecated Online Subsystem) to authenticate with EOS and obtain an external auth token (JWT ID token). The implementation in BeamableEOS.cpp provides a flexible authentication flow with automatic fallback:
- LoginWithEOS Operation: The client calls
LoginWithEOSOperationwhich handles the complete EOS authentication flow - Multi-Method Authentication: The system attempts authentication in priority order:
- PersistentAuth: Automatic re-login using cached refresh tokens from previous sessions
- Exchange Code: Authentication via Epic Games Launcher when launched from Epic's platform
- Developer Auth: For PIE testing using the EOS Developer Authentication Tool (localhost:6300)
- Account Portal: Browser-based login as the final fallback
- Token Caching: After successful authentication, the EOS Account ID (Product User ID) and external auth token are cached in-memory per local player index for use with Beamable
In Blueprint, you can invoke the EOS login flow using operation nodes:

Server-side implementation (Microservice)
The BeamballMs.EpicOnlineServices.cs microservice implements IFederatedLogin<EpicOnlineServicesId> using industry-standard OpenID Connect JWT validation:
- Token Reception: The microservice receives the JWT ID token from the client after successful EOS authentication
- OIDC Discovery: Fetches Epic's OpenID configuration from their
.well-known/openid-configurationendpoint to retrieve the JSON Web Key Set (JWKS) containing Epic's public signing keys - JWT Validation: Validates the token cryptographically using Microsoft's IdentityModel libraries:
- Signature: Verifies the token was signed by Epic using their public keys
- Issuer: Confirms token was issued by
https://api.epicgames.dev - Audience: Validates the token is intended for your Client ID
- Lifetime: Ensures the token has not expired (with 2-minute clock skew tolerance)
- Application ID: Verifies the
appidclaim matches your configured Application ID - User Identification: Extracts the Epic Account ID from the
sub(subject) claim, which becomes the federated identity linked to the Beamable account - Player Initialization: For first-time users, the microservice obtains a client credentials access token and calls Epic's account information API to retrieve the user's display name and preferred language, populating the Beamable account with this data as player stats
This implementation follows Epic's official authentication documentation and security best practices for validating third-party tokens using asymmetric cryptography.
Can I use it as a template?
This sample is NOT a template you can start your own repository from. However, Beamable code components are free for you to copy and use in your own project. Here is what these are:
- The
BeamballMs.EpicOnlineServices.csfile in theBeamballMsMicroservice. You can copy/paste it into any of your microservices - Beamable code inside
BEAMPROJ_Beamball/**/PlatformIntegrationsexcept code inside aThirdPartydirectory - Content inside the
BEAMPROJ_Beamballexcept things inside aThirdPartydirectory
Why no client build
Clients must be pointed at your realm/Epic application, so you need to generate the build yourself by packaging it for any supported platform.