Real-time multiplayer overview
Real-time multiplayer games are typically built around one of three architectures:
- Dedicated servers: a standalone server process — usually hosted on cloud infrastructure — runs the authoritative game state, and players connect to it as clients.
- Listen servers: one player's game client also acts as the host. Other players connect to that machine, which holds authoritative state for the session.
- Deterministic networking (lockstep, rollback, and similar approaches): clients exchange inputs instead of state, and each client simulates the game forward from those inputs.
Unreal supports both dedicated and listen servers out of the box. The Beamable Unreal SDK officially supports only dedicated servers: Beamable's matchmaking, lobbies, and Microservices assume server-side game logic running on infrastructure under the operator's control — important for authority, cheat resistance, and graceful handling of players leaving mid-session. Listen servers may work with Beamable but are not officially supported.
Dedicated servers in Unreal with Beamable
Beamable integrates with Unreal's Gameplay Framework in a couple of different ways; none of those are via an OnlineSubsystem.
Why no Online Subsystem?
Because Beamable's approach to Cloud Code (custom code to extend backend functionality) does not mesh well with those interfaces — you'd end up either losing a lot of Beamable's most useful functionality OR gaining a non-trivial amount of complexity to use it. Therefore, the Beamable SDK provides you with utilities to make dedicated server games itself.
Instead, here are the main components of which you need to be aware:
- Matchmaking: Beamable provides you with a Matchmaking system out of the box that covers simple Matchmaking cases. It is useful during early development and also in production depending on your game's needs. Beamable's Microservices allow you to implement or integrate with more specialized Matchmaking solutions should your game need it
- Lobbies: Beamable's Matchmaking generates, for each match found, a Lobby structure of players. Lobbies are closest to what Unreal's OnlineSubsystem calls a "Session". Lobbies can also be created by players themselves
- Server Provisioning: Microservices let you customize specific points in the Beamable backend; this is called Federation. With Game Server Federation, the Beamable backend calls a method in your microservice after a match is found but before clients are notified
- Game Server Authentication: It is pretty important that you implement Unreal's
PreLoginAsyncat some point before you ship a game. The Beamable SDK'sUBeamLobbySubsystemprovides you with utilities to validate that the user trying to connect is in fact in a lobby the game server is managing and is a valid player - PIE Support: Anyone that has worked in multiplayer games knows about the challenge of maintaining a good workflow in PIE — this is because code written for the gameplay makes all sorts of assumptions about the game state: it usually assumes clients are already logged in and SDKs are initialized, it assumes that a Lobby (or Session) already exists, it'll read data from that Lobby/Session as part of its initialization and systems and so on... the Beamable SDK's
BeamPIEsystem gives you these guarantees in PIE with a single Blueprint node; among other things, this is an extremely useful tool throughout all stages of development - Local and Remote Multiplayer: If your game needs BOTH multiple local players per-client AND remote play, the Beamable SDK also supports that via the User Slot system. Each Client has multiple Runtime User Slots:
"Player0","Player1", etc. In clients, these map to UE's ownLocalPlayerIndex; this mapping is implicit and index-based. You can tell the Beamable SDK about your game'sRuntimeUserSlotsinProject Settings > Engine > Beamable Core. If your game does NOT support local + remote multiplayer, then this is not relevant and the SDK's defaults will work for you.
You can see an example of a working implementation of these in the Beamball Sample.
Does Beamable host Game Servers?
Beamable does not provide Game Server Orchestration. This means that, while Beamable provides Lobbies and Matchmaking and can find matches between players, it does NOT run the actual Game Server. For this, Beamable partners with other companies and provides a simple way to integrate its Matchmaking and Lobbies with them (this is Game Server Federation).
Relevant architecture terminology
This documentation uses a few terms to refer to common parts of the architecture of a Dedicated Server Game.
- Main Boot Level: Refers to the Level in which your Client applications start. This usually maps to your title/main menu screens
- Waiting Room Level: Some games boot the server into an intermediate level while players connect, before performing a Server Travel to the actual gameplay map
- Gameplay Level: This is the Level in which gameplay happens. During development, your designers and gameplay engineers need to enter this level directly using PIE
- Game Server Orchestrator or just Orchestrator: whatever tech is running your actual Game Servers; Edgegap, Agones, GameLyft and others exist in this space
There are other ways to arrange and organize server-authoritative games but most games do something at least similar to this, and, Unreal helps you more if you are close to this.
Getting started - setting up gameplay levels and a PIE setting
This guide explains how to use the SDK's PIE Support to set up your Gameplay Level so you can start experimenting with Beamable immediately.
- Enable the Beam PIE in your
Project Settings > Engine > Beamable Core. - Restart your Editor.
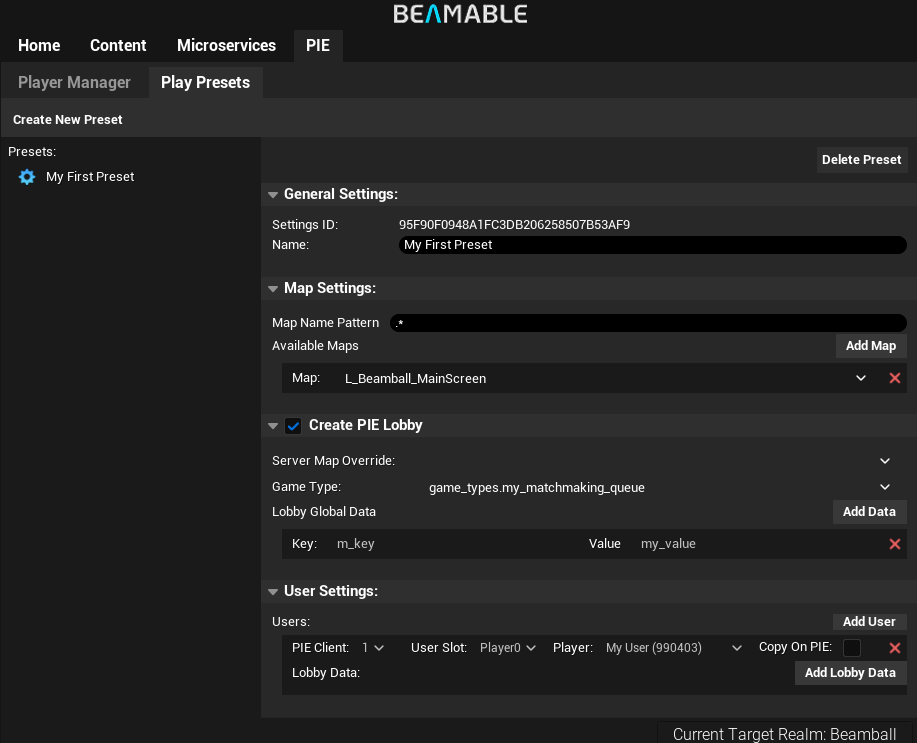
- Create a Game Type content using the Beamable Window - Content tab. Name it
my_matchmaking_queue. - Go to the Beamable Window - PIE tab.
- Use the Player Manager to create a User and set its name to
My User. - Use the Play Presets window to create a
My First Preset. - In Map Settings:
- Choose your Gameplay Level from the dropdown of Allowed Maps. This will make this preset available for use when you have this map open in the editor.
- Toggle the PIE Lobby Settings on.
- Choose the
my_matchmaking_queuegame type from the dropdown. - Add a
my_keyandmy_valueto the Global Lobby Data.
- Choose the
- In User Settings:
- Add a User and select the
My Useryou created previously. - Verify
Copy on PIEis disabled.
- Add a User and select the
Now that you have a preset, you can set up your Gameplay Level to use it:
- Open your Gameplay Level.
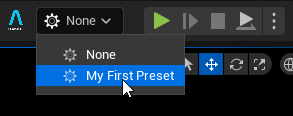
- Next to the PIE Start button, you have a Beamable dropdown. Select the
My First Presetoption from it.
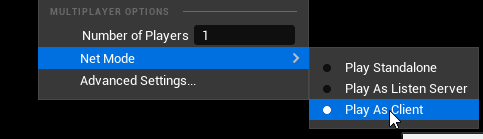
- Change Unreal's Playmode settings to be: Play as Client and Number of Players = 1 (to match the number of users in the PIE Lobby).
- Open your Gameplay Level's Level Blueprint.
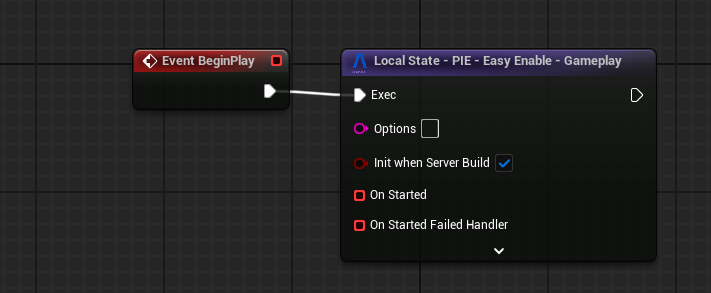
- In its Begin Play, add a
Local State - PIE - Easy Enablenode as the first thing it does.
- In its Begin Play, add a
At this point, BeamPIE is configured. The next couple of steps are here so you can see that the Preset you configured actually created the lobby with the data you defined.
Create and/or open your GameMode Blueprint for this level.
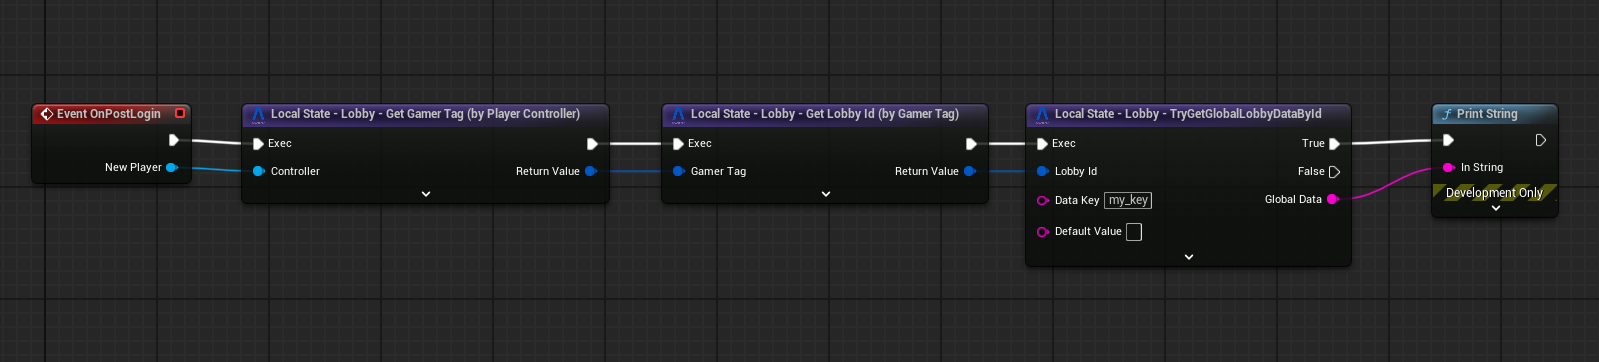
- In its Post Login, add a
Local State - Lobby - Get Gamer Tag (by Player Controller)and pass in the NewPlayer. - Then add a
Local State - Lobby - Get Lobby Id by Gamer Tagto get the Lobby Id for this player. - Then add a
Local State - Lobby - TryGetGlobalLobbyDataByIdpassing in the Lobby Id andmy_key. - Finally, add a
Print Stringnode that prints the returned value (it should bemy_value). - Don't forget to set this
Game Modein UE'sWorld Settings > Game Mode Override.
If you enter PIE now, here's what happens under the hood:
- The Beamable SDK's Easy PIE node will move the server to a development-only Waiting Room Level and wait for all PIE clients to connect
- All PIE clients log in with their mapped users (the ones you configured in your
Play Preset). - The PIE server instance keeps trying to create a lobby with the mapped users until it succeeds.
- The PIE clients wait until they become aware they were put into the Lobby
- Once the Lobby is created and all PIE clients are aware that they are in the lobby, the Waiting Room Server Travels back to the Gameplay Level you started in, taking all clients with them — this time, the
Easy Enablenode does nothing.
Iteration Time
This is the quick setup way. There is a way to avoid the need for this Waiting Room but it requires C++ and a custom Game Instance — this is outlined in the C++ Real-Time Multiplayer Guide.
The above process guarantees two things:
- The SDK in both Clients and Servers is guaranteed to be in the same state they'd be if you had entered the Gameplay Level via your normal flows (starting from the Main Boot Level): the Beamable SDK is fully initialized in both Server and each Client
- Every code/blueprint running AFTER the Game Mode's PostLogin is guaranteed to have no differences between the PIE flow and the Main Boot Level one
And... the above guarantees allow you to just use Beamable with much less PIE-specific code.
Integrating with game mode callbacks and others
There are several overridable functions and events the Game Mode class exposes to you. There is a very important constraint affecting them:
Callbacks that happen before the Player Controller is fully created (before
PostLogin), cannot interact with the Beamable SDK and do NOT have the guarantee the SDK is ready.
This is because initializing the SDK is an Asynchronous Process and takes time — so there is no way to tell Unreal to wait until the SDK is initialized to then run Begin Play. From PostLogin forward, you can make use of the SDK; Content is ready, the Lobby information is available and so on...
World Actors
If you have Blueprints in your Level Actor that need to access data inside the Lobby to be initialized, don't use Begin Play — instead, call a function on it from a point where you have the guarantee the SDK is initialized and ready for use.
If you'd like to see an example of this, take a look at the Beamball Demo.
Preparing a build for your game server orchestrator
This section explains what you need to do before you generate a build to upload to any Game Server Orchestrator such as Edgegap, GameLyft or Agones. This explanation is Blueprint-based, an equivalent C++ explanation is described in the C++ Real-Time Multiplayer Guide.
Setting up your gameplay level's Blueprint
Step 1 - turn on init on server build
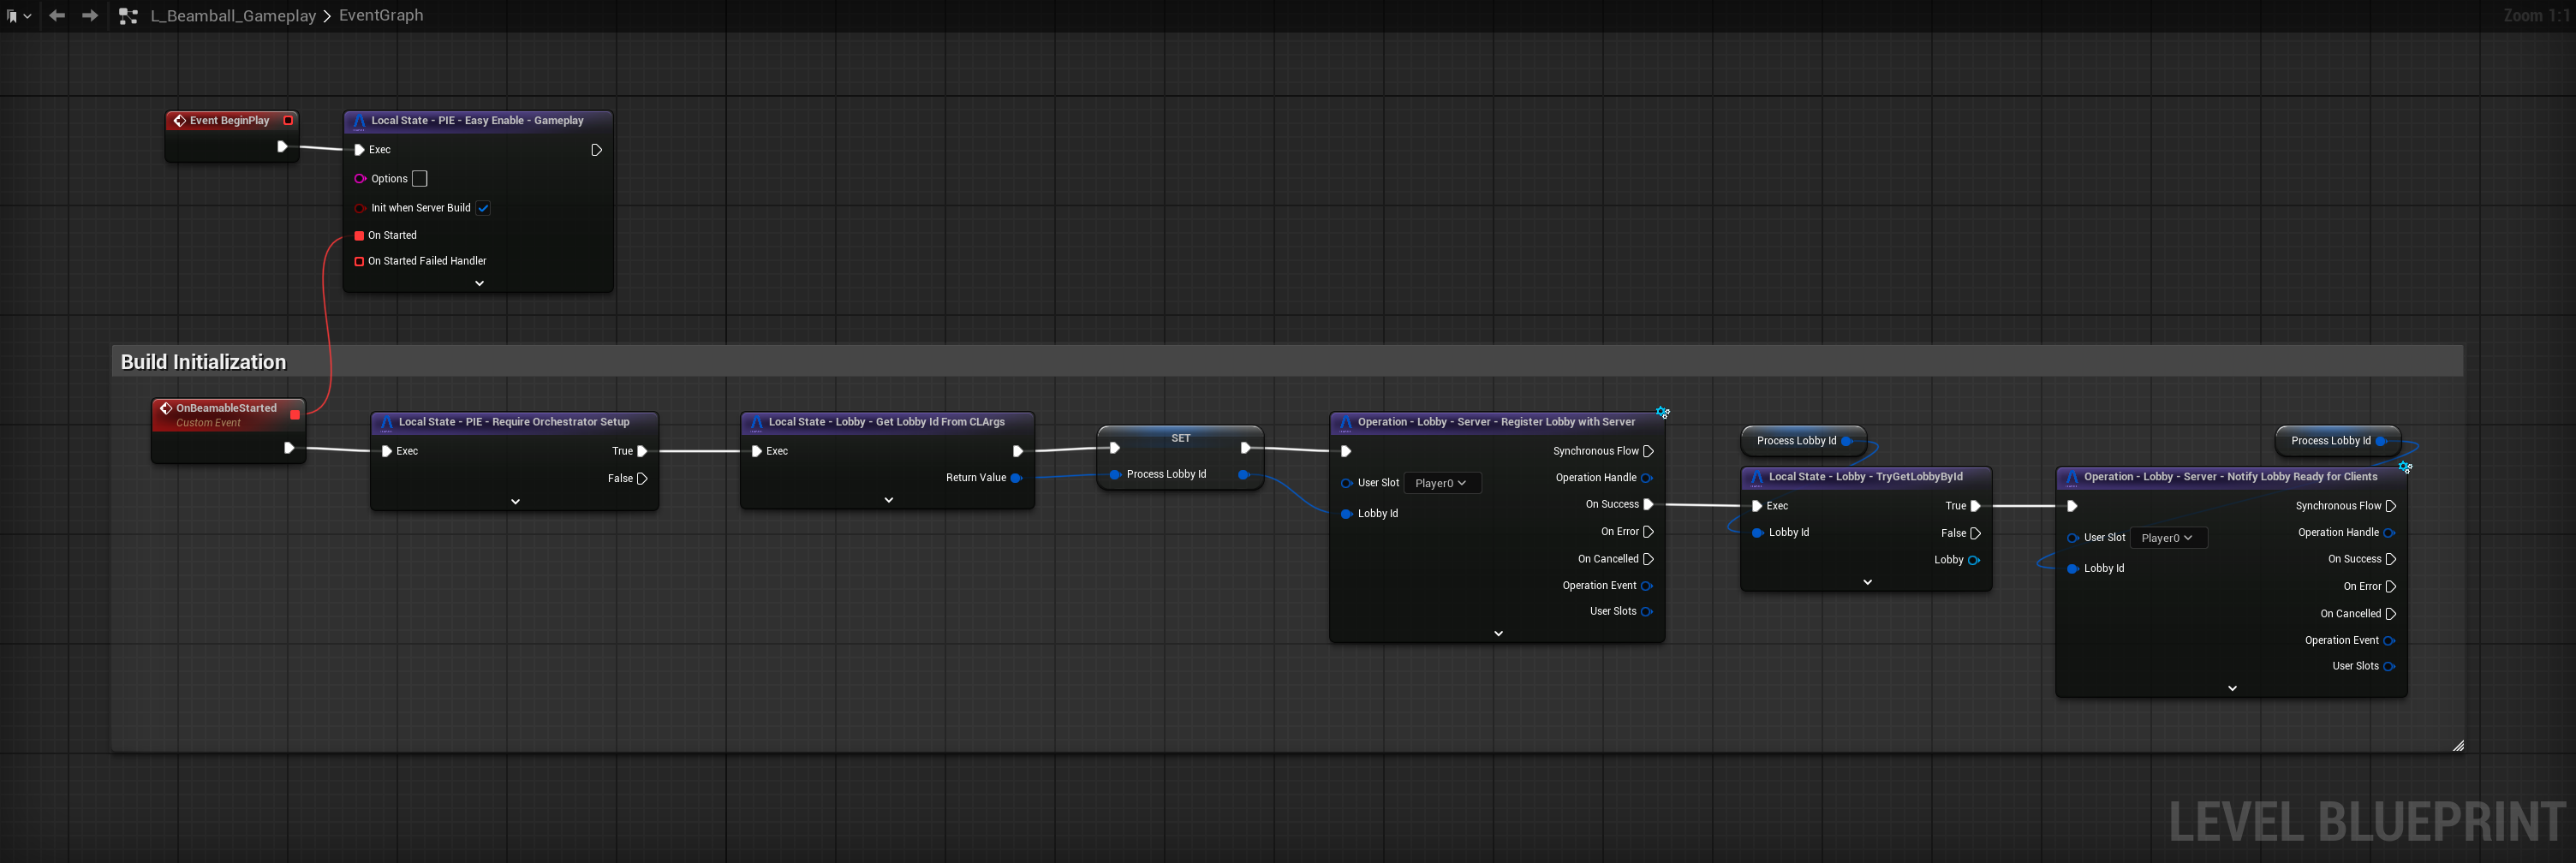
Beamable provides you with an option in its Local State - PIE - Easy Enable - Gameplay node called Init when Server Build:
- When playing inside PIE, turning on this option makes no difference.
- In the actual server build you'll upload, that essentially turns the node into an
InitSDKcall. - In client builds, this node does nothing at all in any case.
You must also create and bind Custom Events to the OnStarted and OnStartedFailedHandler.
This makes it so that the server build will initialize the SDK once it starts.
Step 2 - extract information from orchestrator
When configuring a build with your Orchestrator, they will typically allow you to pass in CLArgs or set Environment Vars for the running Game Server process. You'll need to set up the following ones:
| Value | CLArg/EnvVar |
|---|---|
| Realm Secret | CLArg: beamable-realm-secretEnvVar: BEAMABLE_REALM_SECRETThis is a high-security token that can be found in: Portal -> Games -> Any Realm (...) -> Project Secret OR by running dotnet beam config secret from your project root.Be very careful with this and DON'T commit it to your version control. |
| CID | CLArg: beamable-customer-overrideEnvVar: BEAMABLE_CUSTOMER_OVERRIDEThis is mostly here so you can point the sample builds to your organization; has little bearing on your own games. |
| PID | CLArg: beamable-realm-overrideEnvVar: BEAMABLE_REALM_OVERRIDEThis defines with which of your realms the server will attempt to communicate. Make sure this matches the Realm Secret. |
The exact steps vary by orchestrator, but you can see how each is configured in the Beamball Demo.
In addition to this, inside the Game Server initialization logic, you'll need to do some things to map the Beamable Lobby to this running instance of the game server. There are two strategies to do this:
One lobby per process
The most common way Orchestrators such as Edgegap, GameLyft or Agones pass information to the running process is via Command Line Arguments or Environment Variables. If you are only ever running one Lobby per-game-server-process, pass the lobby ID this way.
For this case, the Beamable SDK expects either the CLArg: BeamableDedicatedServerInstanceLobbyId or the EnvVar: BEAMABLE_DEDICATED_SERVER_INSTANCE_LOBBY_ID to be set and contain the Lobby Id for the match. If they do, you can use Local State - Lobby - Get Lobby Id From CLArgs to get this value.
Each orchestrator has their own way of allowing you to define CLArgs and EnvVars that it'll pass into the running game-server process — see your chosen orchestrator's documentation for how to pass these along; you can also refer to the Beamball Demo to see how it handles this with Edgegap (as per Edgegap docs, involves a Dockerfile and a sh script).
Multiple lobby per process
If you are planning on having multiple lobbies per-game-server-process, your orchestrator will either:
- Give you an SDK that allows you to receive notifications whenever a lobby is assigned to a running process
- Give you an endpoint you can periodically call to check if new lobbies have been assigned to the running process
Either way, at that point, your orchestrator will have provided you the Lobby Id.
Step 3 - register the lobby with the SDK running in the game server
Once the Lobby ID is known, register it with the Beamable SDK. "Registering a Lobby with the SDK" means the SDK will fetch the lobby's information and set up the necessary mapping between each user in the lobby and Unreal's Gameplay framework types (FUniqueNetIdRepl).
To do this, you can call Operation - Lobby - Server - Register Lobby with Server.
Step 4 - prepare for gameplay and notify clients they can connect
Once the lobby is registered, you can use Local State - Lobby - TryGetLobbyById (and Local State - Lobby - TryGetLobbyPlayerDataById and Local State - Lobby - TryGetLobbyGlobalDataById) to read data from the Lobby to initialize your game server.
This initialization can be preloading assets, making requests to microservices and so on...
Once this is done and you are ready to accept client connections, you should call Operation - Lobby - Server - Notify Lobby Ready for Clients. This signals your awaiting Game Server Federation's CreateGameServer implementation that the game server is ready to accept client connections — allowing it to complete so that Beamable notifies all players in the Lobby forwarding the connection information to them.
After these steps are completed, you'll begin receiving connections — in UE, handling player connection and initialization is done in a Game Mode implementation (see the section below).
What's next?
With this, you are set up to begin experimenting with your gameplay systems in PIE. In early development, use this to figure out which Key-Value pairs you'll need in the Beamable Lobby structure. This should allow you to work on your gameplay development directly in PIE before doing the work to integrate with your Game Server Orchestrator using the Federation system.
When you decide to implement Game Server Authentication, take a look at the C++ Real-Time Multiplayer docs — Unreal does not allow for a BP-only authentication flow (it needs PreLoginAsync which is a C++ only callback in the Game Mode).